
.png)
June 23, 2015
Referential integrity and its role in data warehousing: part one
.png)
In this pair of tech blog posts, Rob Hawthorne, our head of Microsoft Solutions and Architecture, walks us through the steps needed to implement referential integrity in our data warehouse and keep our DBAs happy. This blog is targeted at business intelligence developers or those with a keen interest in learning new ways of managing metadata in SQL Server.
As a business intelligence developer, I have heard many, many times from DBAs that data warehouses should have referential integrity (RI). However as any BI dev knows, this is not that easy. Why? Well, generally speaking, when we are loading facts and dimensions, we tend to dump all the data and do a full re-load of these tables. This makes it simple to do joins (for key lookups) and ensures that the keys line up properly. So far so good. However, if you have ever tried to truncate a table with RI enabled, you would see messages like the following:

While it is fine to truncate the fact table, you can’t truncate the dimension. So most BI devs (and most solutions I have seen) do not implement RI, as it is just a bit of a pain at the end of the day.
So how do we keep DBAs happy, but also make it easy for ourselves to manage RI? Thankfully SQL Server comes to the rescue.
Internally, SQL Server holds a lot of metadata about tables, indexes, relationships, column types, etc. This means that all that information is queryable through the system catalog views (as long as you have the appropriate permissions of course).
In this article we are going to look at how to use that information to build our RI, and tear it down and re-establish when we have completed our ETL. There are code examples, so you do need to be comfortable with SSIS and basic T-SQL.
This article is built using the AdventureWorksDW2014 database, which you can download from CodePlex.
Note: Use of this Referential Integrity Manager is entirely at your own risk. Theta makes no representation or warranty regarding its use.
Getting the Information from SQL
The first step is to get the RI information out of SQL. We use the system views to get this. We will use the following views:
- sys.foreign_key_columns – Provides information about the columns (fields) used in a foreign key within a database - https://msdn.microsoft.com/en-us/library/ms186306.aspx
- sys.foreign_keys – Provides information about the foreign keys in a database, i.e. name, referenced object, etc. - https://msdn.microsoft.com/en-us/library/ms189807.aspx
- sys.tables – Provides information about the tables in a database, i.e. name, object_id, type, schema it belongs too, etc. - https://msdn.microsoft.com/en-us/library/ms187406.aspx
- sys.schemas – Provides information about the schemas in a database, i.e. name, object_id, owner. - https://msdn.microsoft.com/en-us/library/ms176011.aspx
- sys.columns – Provides information about the columns within a table (or view), i.e. name, data type, size, table it belongs too, etc. - https://msdn.microsoft.com/en-us/library/ms176106.aspx
As you can see there is some pretty rich metadata about the objects within a database.
The following query will retrieve all of the information we need about the RI in our database:
NOTE: This is limited to a single schema (dbo) and a single fact table (FactInternetSales).
.png)
This brings back a result set like this, giving us the name of the foreign key, the foreign key schema, foreign key table name, the referenced table name, schema and column.

It also extracts the actions that the key takes when actions like delete and updates are executed..
Right, so at this stage we have the information, but you may find that your database doesn’t have any RI constraints. The quickest way to create this is via the database diagraming tool within SQL Server.
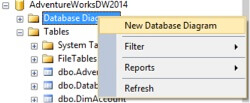
Go ahead and build your database diagram. This will serve 2 purposes:
- You can carry on with this article!
- You can validate that your data will support RI being enabled
Since the Adventure Works DW is based on Kimball’s methodology we have a star schema, which resembles this:
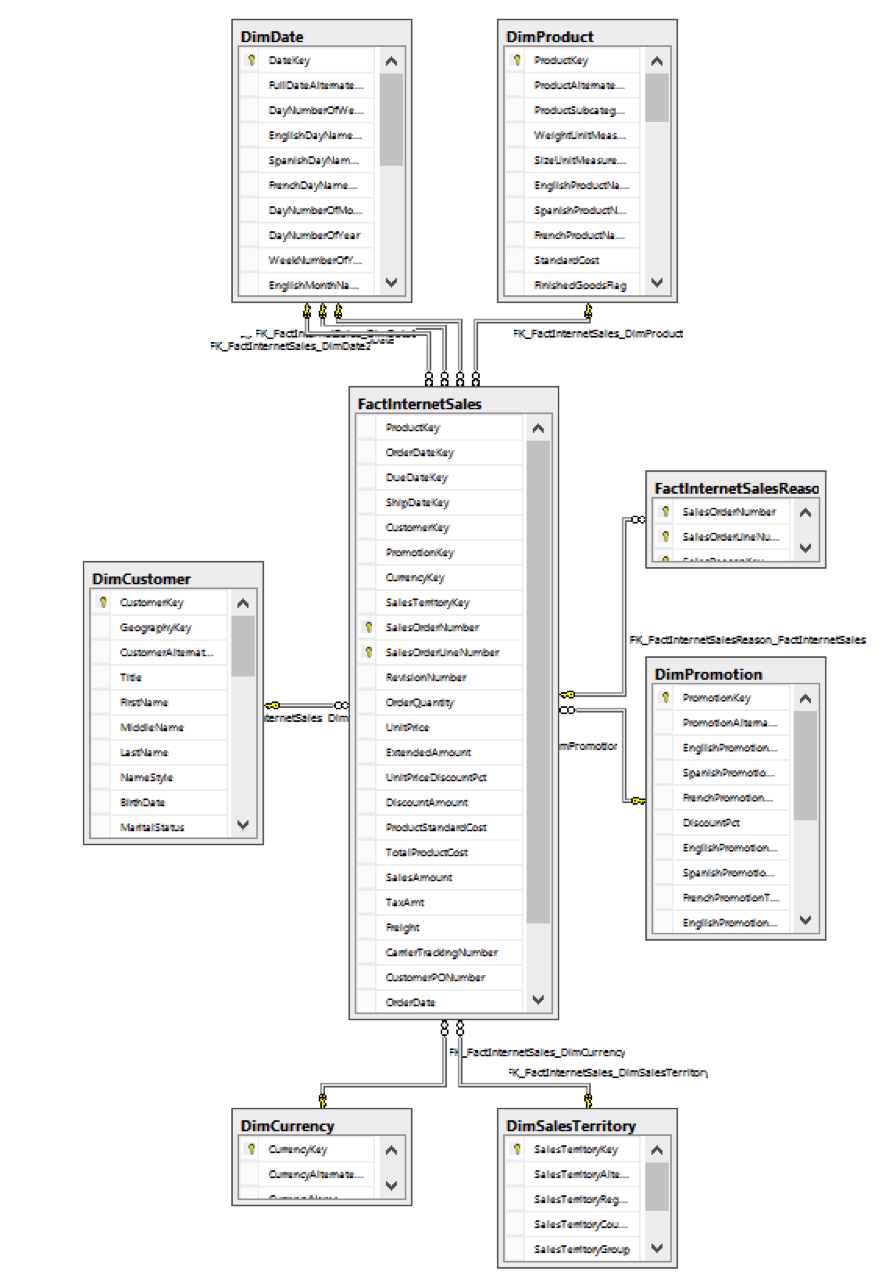
This is a typical scenario, lots of relationships and also multiple keys referencing the same table (i.e. three constraints referencing the DimDate dimension).
We now have the RI enabled for our star schema. Let’s look at how we can use this in our ETL.
Structuring our ETL for RI
The first thing to do is to extract the RI and store it somewhere. When I first started on this path, I put the RI configuration into memory, but if you stop the ETL (especially when developing) you lose the configuration and have to start all over again! So lesson learnt, we will dump the configuration out into a table for storage.
Just add the following line to the SELECT statement:
.png)
For example:
.png)
This will allow us to store the configuration of our Foreign Keys in a table within our database.
Here’s a tip: make another copy of the data into a secondary table as well. Sometimes when developing you have to empty the dbo.ForeignKeyReferences table and as such you won’t want to rebuild the entire data set again. Create a second table either within the same database or a configuration database. It will come in handy. I called my second table dbo.ForeignKeyReferences_Backup. You can name it anything that makes sense to you.
Now the fun part! We will create a new SSIS task to deal with the RI. In your Visual Studio project, add a new SSIS package.
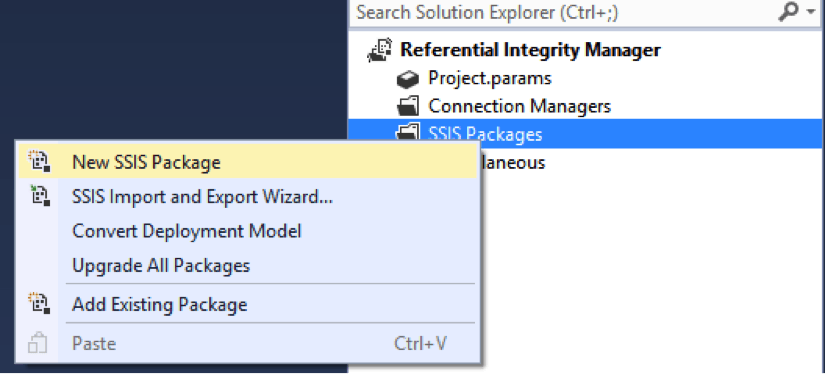
I call this new package 000 - Preliminary Tasks.dtsx, as I want it to be clear it executes before any of my ETL starts. Again you can name it whatever you like.
Building the SSIS task:
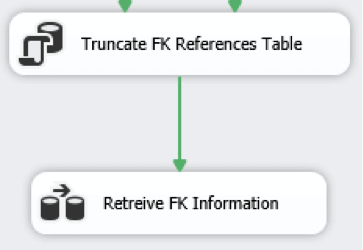
The first step is to retrieve the information we have and store it within the dbo.ForeignKeyReferences table. You want this to be refreshed every time the package runs (i.e. in case the RI changes), so our very first step is to add a TRUNCATE TABLE to the package (see now why we have a second table?).
In the new package add an Execute SQL Task. If you don’t have a data connection setup (and you probably won’t as this is a new package) go ahead an add a connection to your SQL instance and database that contains the dbo. ForeignKeyReferences table.
In the Execute SQL Query task editor, add the line TRUNCATE TABLE dbo.ForeignKeyReferences, as shown below:
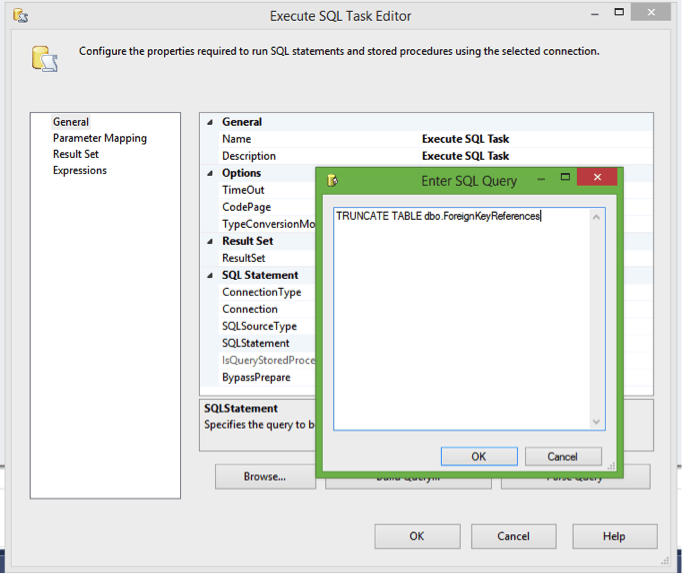
You should also name the Execute SQL Task appropriately. I’ve called mine Truncate FK References Table.
Note: If you want to build more robust code, you should put in a check for the existence of this table first and either error out if it doesn’t exist or choose a different path and create the table. I have added this second option into the sample code with this article, but for sake of brevity I have excluded it from the article.
Now add a Data Flow Task to retrieve the information from the sys catalogs (I’ve called mine Retrieve FK Information):
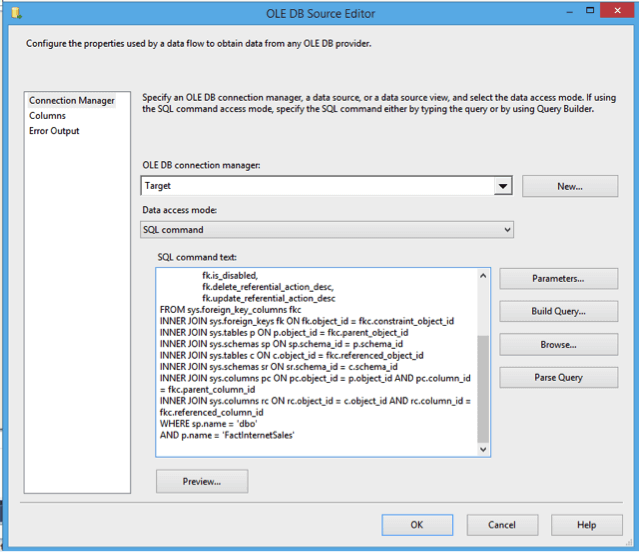
In the Data Flow Task, use the Source Assistant (it will create an OLE DB task based on the connection type you created earlier). Set the Data access mode to SQL command, and paste the query (2) we wrote earlier.
Now we need to write this information to our table. Use the Destination Assistant wizard to create a target. Open the destination and set the table to the ForeignKeyReferences table.
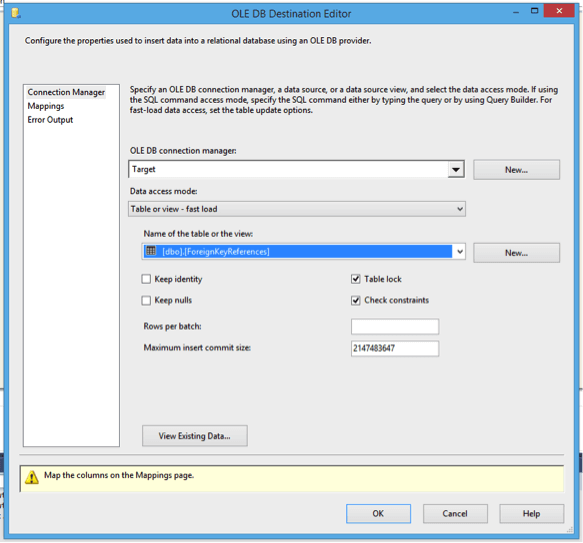
Note: Check the Mappings tab to ensure that the columns are lined up correctly.
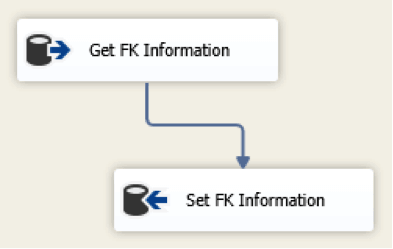
You should now have a Data Flow Task that is similar to:
Save your work!
Now we can test the package to ensure it is running as expected. Right click on the package and select Execute:

If all is well the tasks should show up as executing successfully (ticks next to the successful tasks):
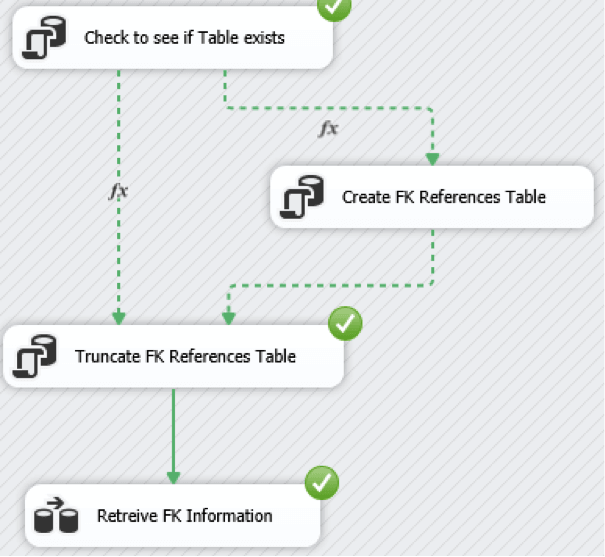
Go ahead and check that the dbo.ForeignKeyReferences table holds the FK information.
If it doesn’t or the package didn’t execute successfully, check the Execution Results tab in Visual Studio, and check for any configuration mistakes, i.e. missing data source connections, incorrectly typed code (especially if copied from a web page), etc.
So to recap: we now have a small SSIS task that extracts the foreign key definitions from within SQL Server, and stores within a table. Next we will create a For Loop container to remove all of the foreign key definitions from the database.
Dropping the FK References:
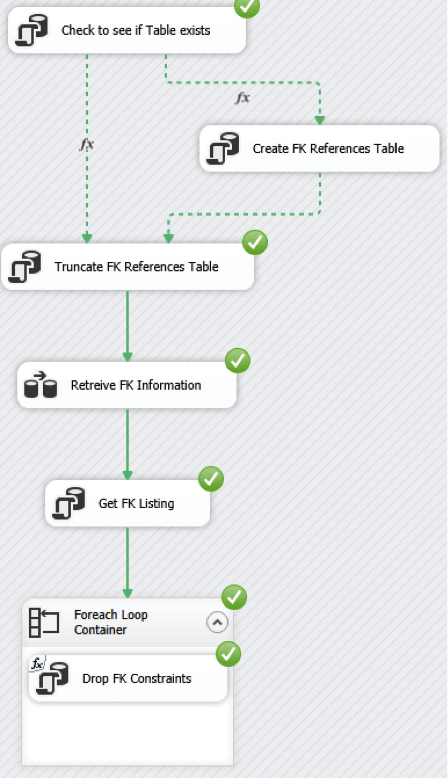
Let’s now add a new Execute SQL Task to get the names of all the FK references from the data we have stored in our table. Have the success flow from the Retrieve FK Information Data Flow task connect to the newly added Execute SQL Task (I have named mine Get FK Listing).
Use the following query in the Execute SQL task:

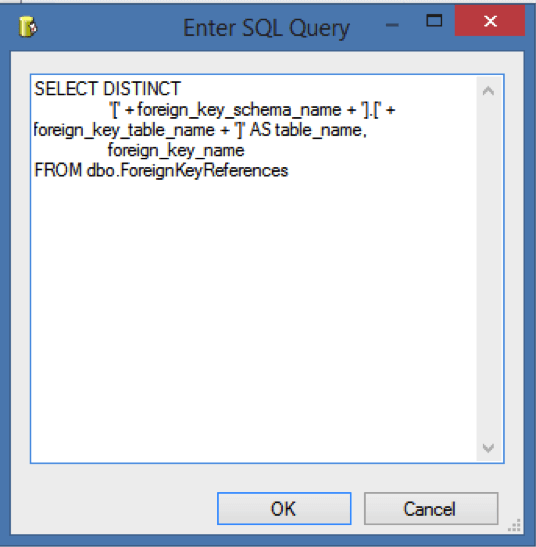
We will place this into a variable, so we can iterate through the result set and drop the constraints.

On the “Result Set” tab, Add and create the variable:
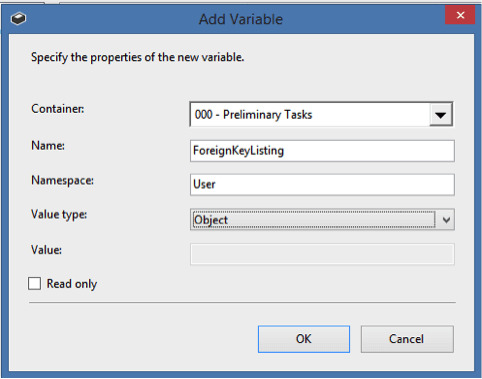

We will use this object variable to iterate through in the next step.
Add a Foreach Loop Container to the package, and have the success flow from the Get FK Listing task connect to the Foreach Loop Container:
Use the following query in the Execute SQL task:


We will place this into a variable, so we can iterate through the result set and drop the constraints.

On the “Result Set” tab, Add and create the variable:


We will use this object variable to iterate through in the next step.
Add a Foreach Loop Container to the package, and have the success flow from the Get FK Listing task connect to the Foreach Loop Container:
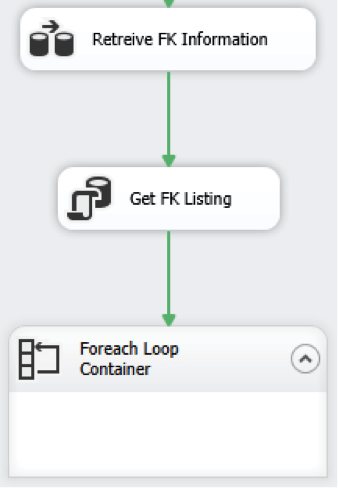
On the Foreach Loop Container editor, select the Collection tab and change the Enumerator to Foreach ADO Enumerator and in the ADO object source variable: select the newly created variable (User:ForeignKeyListing). Set the Enumeration mode to Rows in all the tables (ADO.NET dataset only).
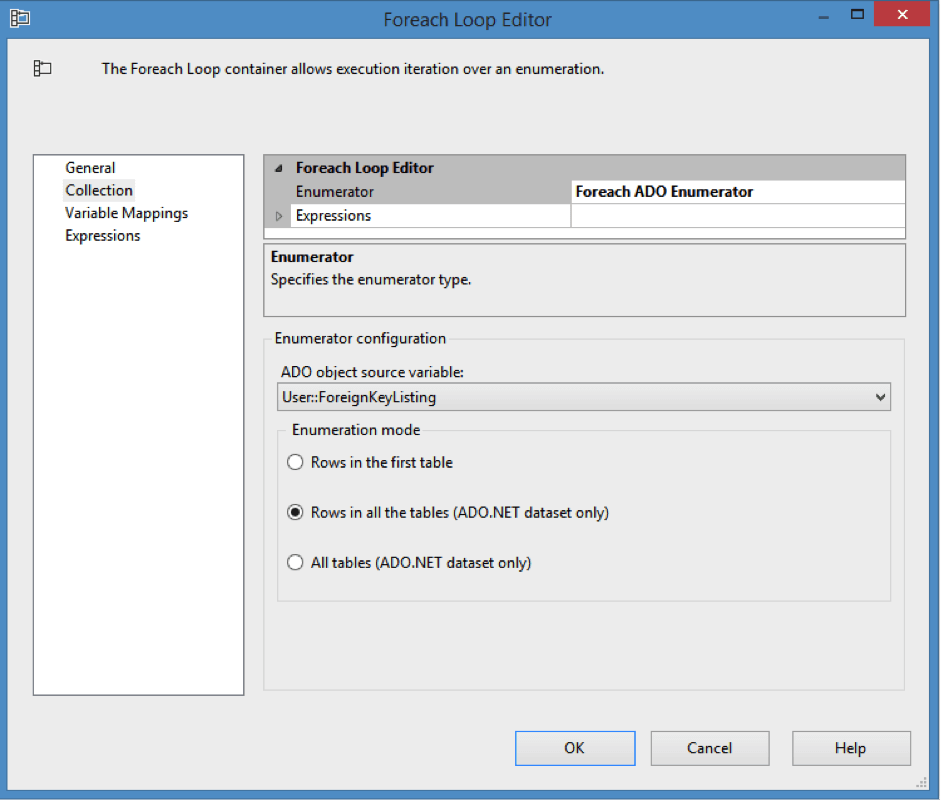
This will allow us to iterate through the return result set. Next we are going to assign our rows to 2 variables (we have 2 columns coming back from our query table_name and foreign_key_name).
Now select the Variable Mappings tab and in the Variable select the option <New Variable…>.
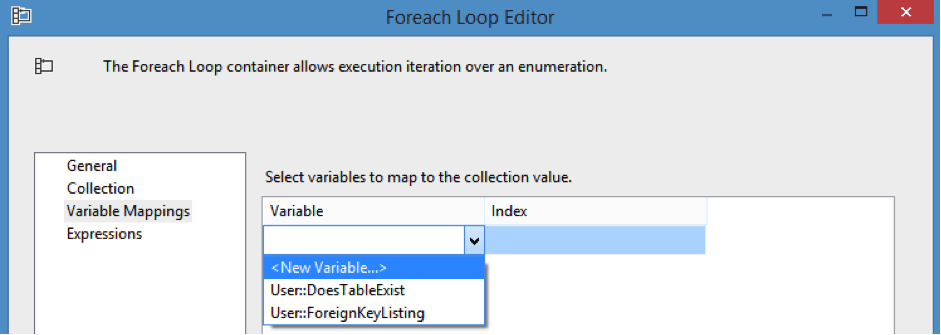
Create a new variable called TableName of type String.
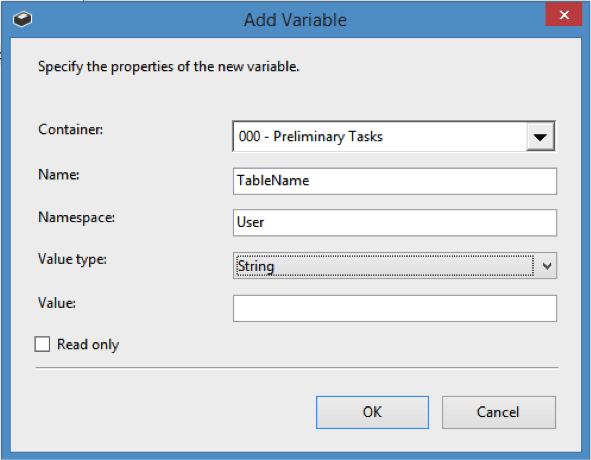
Click OK. When back in the Foreach Loop Editor, again select the <New Variable…> option, and create another string variable called ForeignKeyName.
Make sure TableName is assigned to Index 0 (table_name – column 1 from our query) and ForeignKeyName is assigned to Index 1 (foreign_key_name – column 2 from our query).

Ordering is extremely important, as the query to variable mapping is not bound to column names but ordinal position (this is why we avoid SELECT *).
Now we are set up to iterate through our loop and assign the query result set to our variables. Next we need to actually remove the foreign key references from the tables.
To do this we add an Execute SQL Task into the Foreach Loop Container.
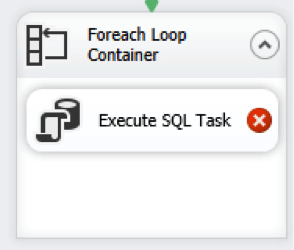
Note: This must be within the Foreach Loop Container or we will only remove the first FK (assuming your variable assignment is at package level), and not the subsequent ones.
On the Execute SQL Task set the connection to use the target database, and add the following SQL to the SQLStatement of the task:
.png)
Note: This is just a place holder and we will modify the constraint as we iterate through the results.
On the Expressions tab click the ellipsis (…) button and select SqlStatementSource as the Property on the Property Expressions Editor.
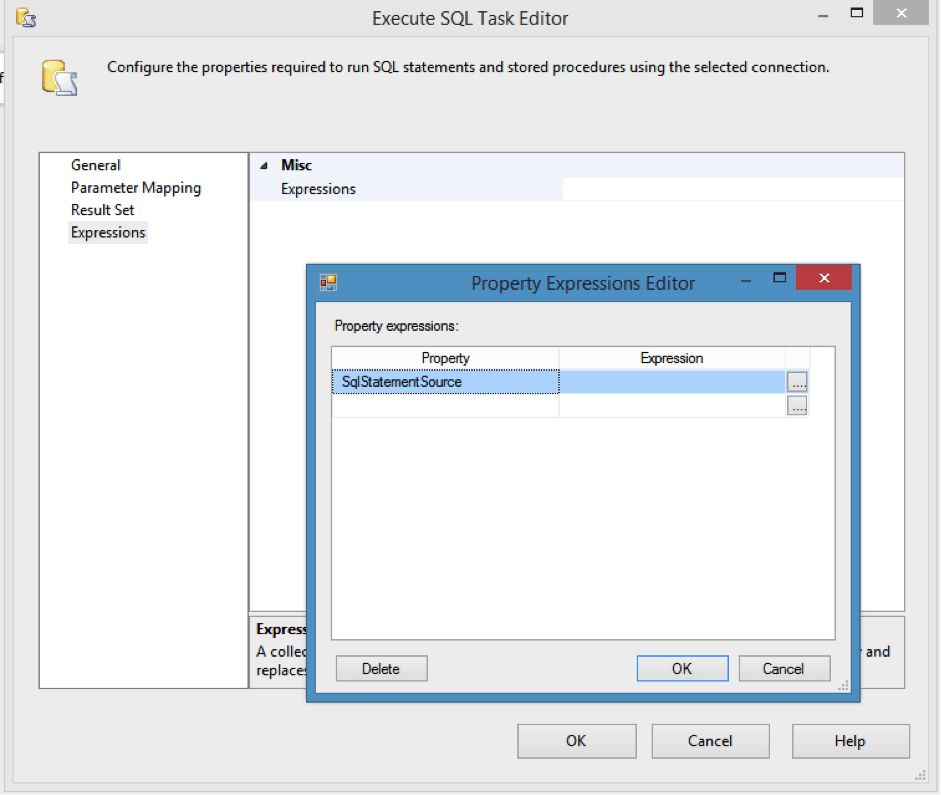
Then click the ellipsis button in the Expression section. This will allow us to create a custom string that replaces the original query in the Execute SQL Task we originally created.
Add the following code into the Expression Builder window:
"ALTER TABLE " + @[User::TableName] + " DROP CONSTRAINT " + @[User::ForeignKeyName]
Note: The double quotes (") dictate a string literal, and the plus (+) appends another string to this one, therefore we are now appending our table name to the ALTER TABLE statement.
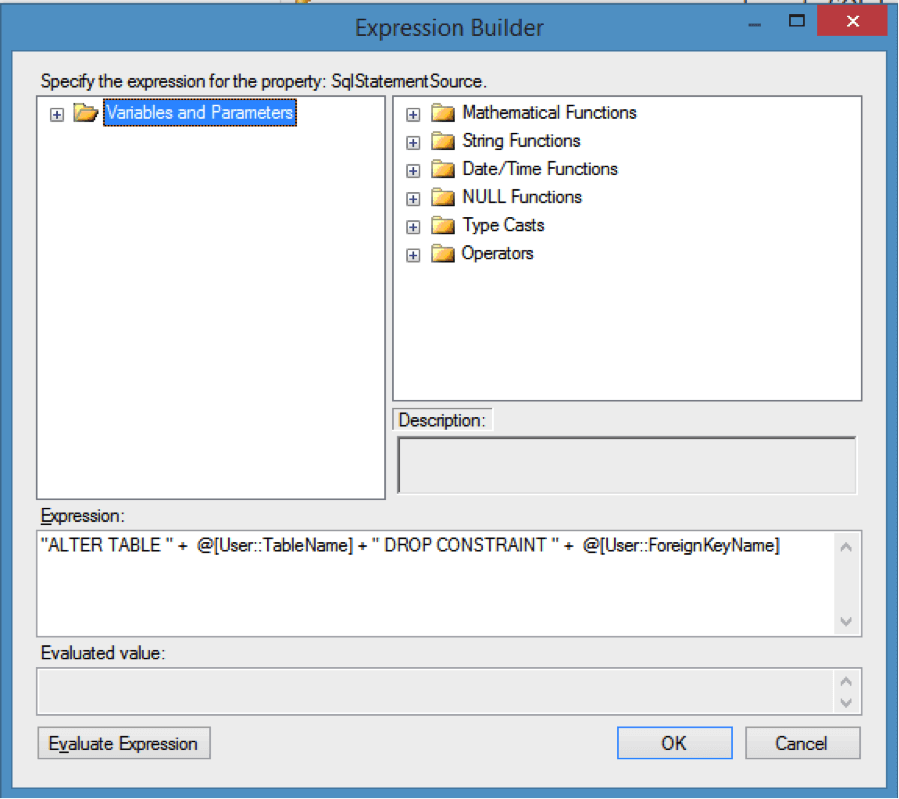
If you click the Evaluate Expression button SSIS will attempt to determine the results of your code:
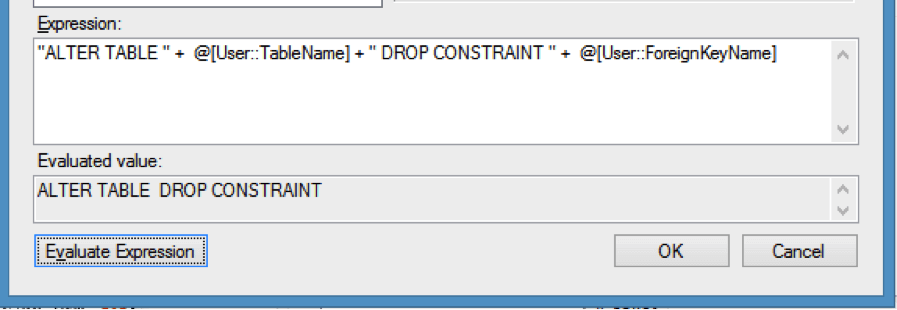
We do not get any table or FK names in the evaluation because when we created the variables we didn’t assign a default value to them. If you modify your variable to have a default value this would evaluate with the variable values within the string.
So now we should be ready to test to our results.
Let’s pop back to SQL and look at our Entity Relationship Diagram (ERD).

Close the diagram (no need to save it).
Now go back to your package and execute it:

All going well it will execute successfully:
Now go back to SQL and create a new ER diagram. Add the FactInternetSales table to the diagram, right click on the table and select Add Related Tables.
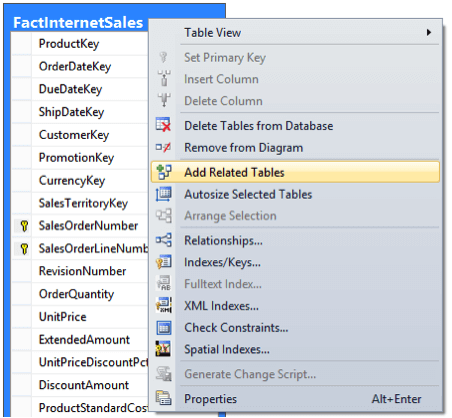
And – ta-da! - our diagram now looks like this:

Notice that the FactInternetSalesReason table is still referenced by FactInternetSales. This is because the FactInternetSales table is the parent and the FactInternetSalesReason is the child record. Therefore if we do this for the entire database we would need to perform the removal in the correct order, i.e. remove the constraints from FactInternetSalesReason and then any subsequent tables.
So far, we have collected the foreign key definitions from SQL, stored these in a table and then iterated through and removed the constraints. At this stage you would then run your full ETL and populate all your tables.
Next we are going to add the constraints back to our database. Read part two.


.jpg)


.png)

